Indulging in chocolate-dipped candies is an enjoyable experience that can satisfy even the most ravenous, sweet appetite. The art of dipping candy in chocolate is both a science and an art, whether you’re creating treats for a special occasion or simply seeking a creative and tasty snack. To master this culinary skill and create confectionary masterpieces, you will need more than a dish of melted chocolate and some candies. In this article, we will explore the best techniques and suggestions for ensuring that your chocolate-dipped confectionery creations are a delicious success.
Best Way To Dip Candy In Chocolate
It can be a delectable and enjoyable experience to dip candy in chocolate. The following is a step-by-step guide to achieving the finest results:
Ingredients and Tools:
- Candies and snacks of your choosing (such as pretzels, marshmallows, fruit, pastries, etc.)
- Chocolate (melting chocolate or morsels of premium chocolate)
- Bowl suitable for the microwave or a double boiler
- Spoon and fork
- Wax paper or parchment paper
- Sheet or platter for baking
- Decorations (chopped pecans, sprinkles, etc.) are optional.
The Method
1. Prepare Your Workspace
Using parchment paper or wax paper, cover a baking sheet or tray. The sweets won’t stick together, and it will be easier to clean up.
2. Melt the Chocolate
There are two primary approaches to chocolate melting:
Microwave: Put the chocolate in a container that can go in the microwave. Heat it for 20 to 30 seconds, stirring each time, until it is smooth and melted. Avoid overheating the chocolate, as it can easily catch fire.
Double Boiler: Set a small pot on low heat and add water. Place a heat-resistant (metal or glass) bowl over the pot, ensuring it does not contact the water. Add the chocolate to the basin and stir until it has melted entirely.
3. Stir the Chocolate
After the chocolate has melted, stir until it is smooth and lustrous. This will aid in the removal of any irregularities or air pockets.
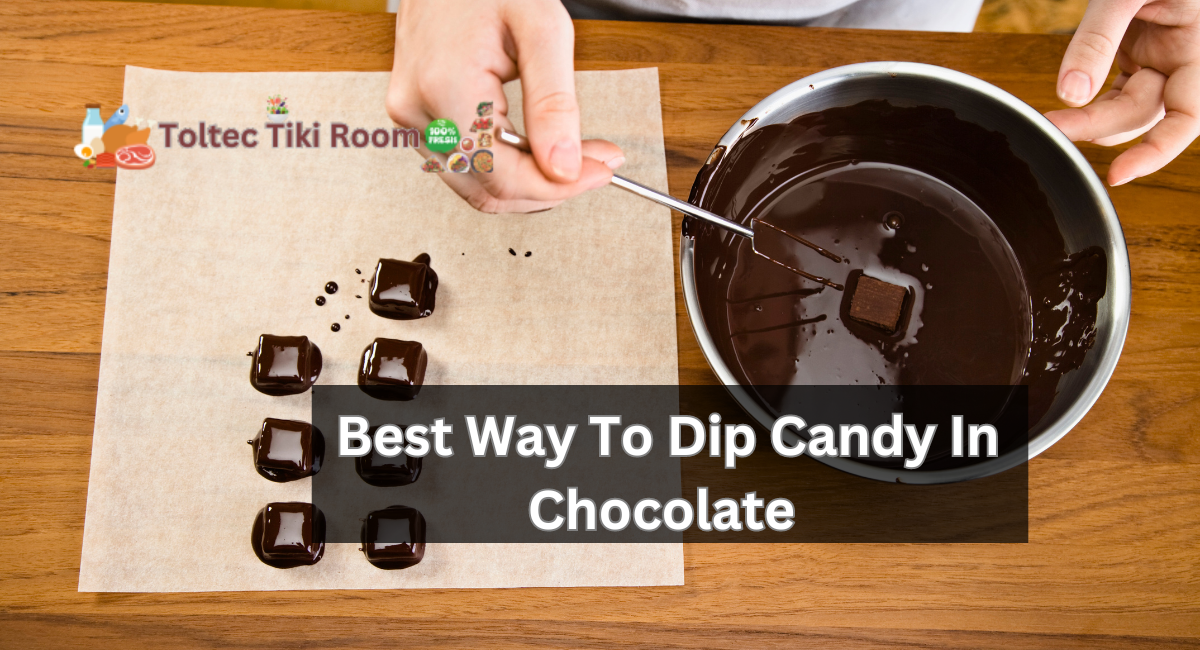
4. Candy Dipping
Using a fork or a utensil, dip the confections or sweets into the melted chocolate. Ensure a complete coating. Allow excess chocolate to trickle away.
5. Shake Off Excess Chocolate
To remove excess chocolate, lightly tap the utensil or spoon against the side of the bowl. This will produce a more uniform covering.
6. Place on Parchment Paper
Transfer the confection to the baking sheet or tray that has been prepared with care. To prevent adhering as the chocolate hardens, ensure they do not come into contact.
7. Decorate (Optional)
If you wish to add sprinkles, chopped nuts, or other embellishments, you should do so while the chocolate is still moist.
8. Allow to Set
Allow the chocolate-coated candies to remain at room temperature until the chocolate hardens. You may also place them in the refrigerator to expedite the curing process.
9. Store
Once the chocolate has completely hardened, you may store the dipped candy in an airtight container in a cold, dry location.
Tips For Dipping Candy In Chocolate
Here are some tips for dipping candy in chocolate :
- Never spiral. Drop your confection or truffle into the chocolate, then spoon the chocolate over the top. The truffle breaks when agitated.
- With a fork, remove the truffle from the chocolate. The excess chocolate will trickle through the tines of the fork.
- Use the Bakerella Tapping Method by tapping your hand and not your utensil. Avoid tapping the tine against the bowl’s rim. The impact of tapping on a truffle is minimal.
- To keep the truffle from “falling truffle syndrome,” use a toothpick to help move it from the fork to the cookie sheet.
- Truffles’ best companions are sprinkles. They conceal every flaw. And they’re amusing. Use them extensively.
Enjoy your labors in the kitchen. Then continue practicing!
Tips For Making Dipping Chocolate
Here are some tips for making dipping chocolate :
1. Avoid Moisture
Avoid moisture at all costs. Chocolate and water do not get along, and even the tiniest amount of water or a water-based ingredient will cause the chocolate to solidify and form a difficult-to-work-with, inedible lump unsuitable for dipping.
2. Use Indirect Low Heat
Many people enjoy melting their chocolate in the microwave, and if that works for you, that’s perfectly acceptable. It works half the time, but the other half of the time, I boil it, and it turns chalky or just tastes burnt.
If you want the same results every time, I suggest using a double pot. If you have to use a microwave, ensure the power is turned down so the chocolate doesn’t get too hot.
3. Use Oil-Based Flavorings
When you need a beautiful yet straightforward dessert for a special occasion, there is nothing simpler than making flavored chocolate bark. I love making peppermint bark for the holidays. It’s made with candy canes, dark chocolate, and white chocolate that tastes like peppermint. Another delicious combination is dark chocolate almond marzipan.
Flavoring the chocolate enhances the overall consumption experience, but alcohol and water-based extracts and emulsions will cause the chocolate to solidify.
Use culinary oils that come in a variety of flavors instead. For all my flavored confectionery, I use L’oran oils.
From choosing the right chocolate to mastering the art of the perfect dip, creating chocolate-dipped candies is a rewarding activity that anyone can undertake. With the proper equipment, methods, and practice, you can improve your candy-making skills and dazzle your friends and family with professionally dipped candies. Embrace your inner chocolatier and make chocolate-dipped candies that are as visually appealing as they are delicious. Your taste senses will be appreciative.
Thanks for visiting our site hope you like it ….